Frequently Asked Questions (FAQ)
How can I make a donation to this project?
There are some button names or messages written in Japanese. What do they mean?
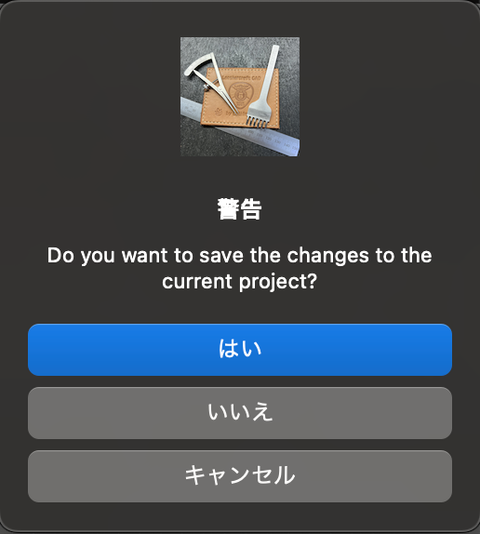
If you encounter a dialog box with buttons written in Japanese, the following is the translation:
はい = Yes
いいえ = No
キャンセル = Cancel
I am trying to fix this issue but it’s dictated by the software development tool and so far I haven’t find any solution for that. I am asking for a help to the dev tool vendor to solve the issue, but in the mean time, please
How can I export my patterns as PDF?
For PDF export, please use the Print feature. You can export as PDF just like printing to real papers.
If you are using Windows OS, then please select "Microsoft Print to PDF" in the print dialog. Then it will print as PDF.
If you are using macOS, please click the PDF pulldown at the left bottom of the Print dialog then select "Save as PDF...".
Since v4.0, printer calibration is not applied to PDF output by default, so PDFs are always exported at actual size — safe to hand to laser-cutting / die-making services as-is. (If you do want your printer's calibration applied to PDFs, e.g. for convenience-store printing, uncheck "Do not apply size calibration when exporting to PDF" in [Edit] → [Settings...].)
My print out is not accurate. How can I calibrate my printer?
First of all, please make sure in the print option dialog that scaling is set to None or custom 100%. If the print outs are not accurate please follow the below steps to calibrate your printer for Leathercraft CAD. Since v4.1.1, calibration has its own dedicated screen, and the calibration pattern uses longer rulers (160 mm horizontal × 220 mm vertical) for a more accurate correction. (←super important!)
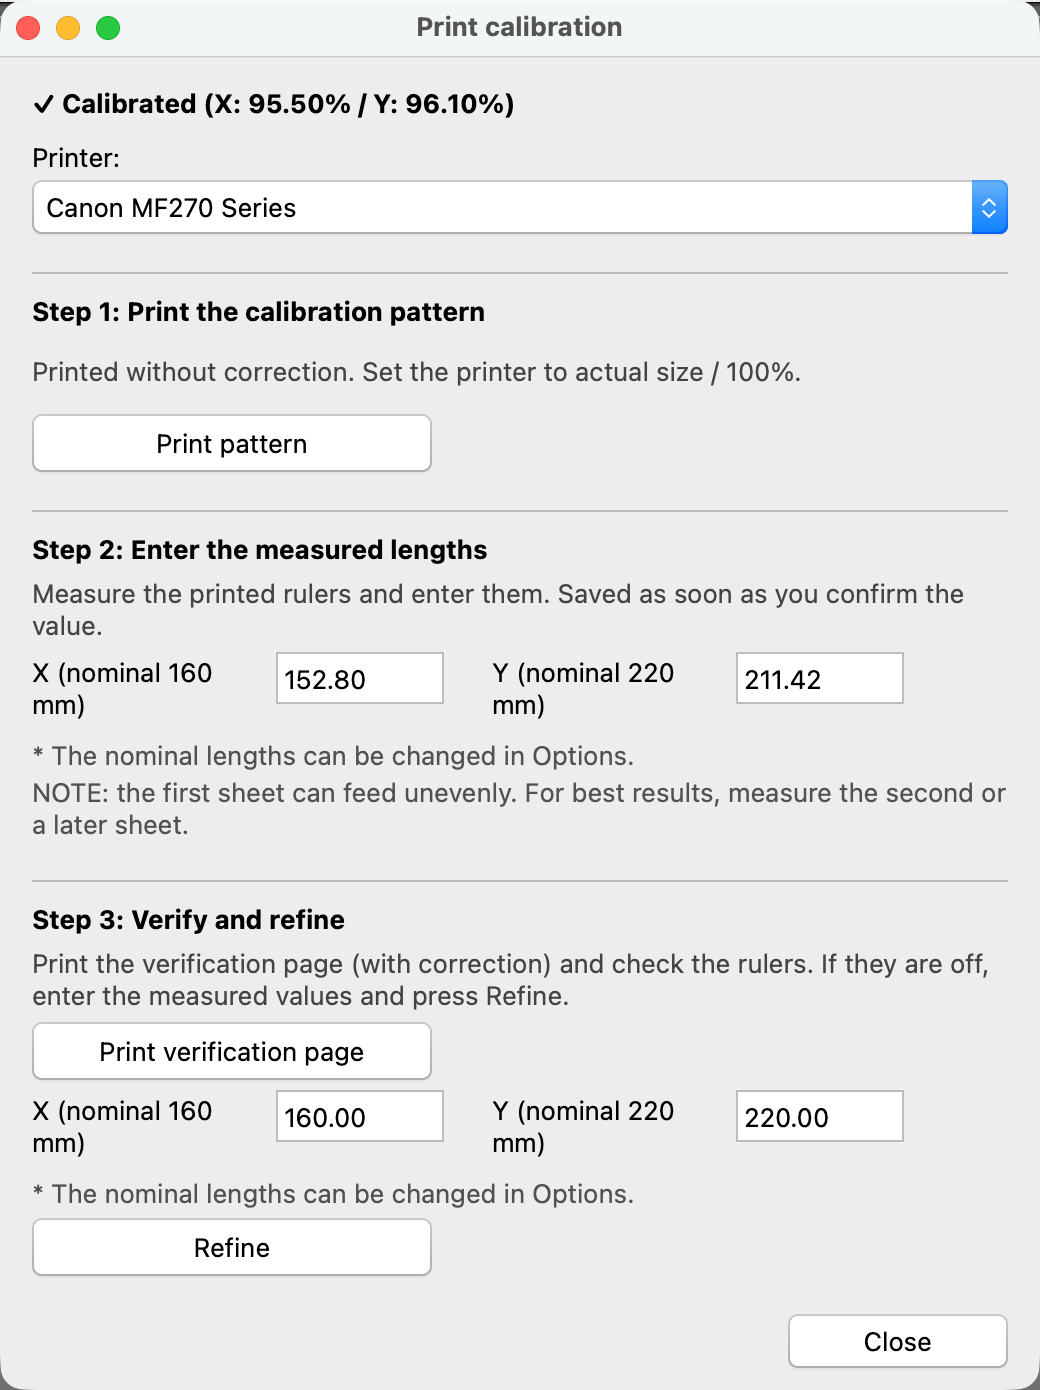
- From the main menu, select [File] → [Print Calibration...]. The Print calibration window opens. (You can also open it with the [Calibration...] button in the "Print Scale Calibration" section of [Edit] → [Settings...].)
- Choose the printer you want to calibrate in the Printer: list. The top line shows whether that printer is "⚠ Not calibrated yet" or "✓ Calibrated".
- Step 1: Click [Print pattern] and print from the print dialog that opens. Uncorrected rulers, 160 mm horizontal and 220 mm vertical, will be printed. Set the printer to Actual Size / 100% and keep the paper orientation Portrait (this is important!).
- Step 2: Measure the printed X (horizontal) and Y (vertical) rulers and enter the measured values (in mm) into the X and Y fields. The values are saved as soon as you confirm them, so there is no OK button to press. The first sheet can feed unevenly, so for best results measure the second or a later sheet.
- Step 3: Click [Print verification page]. This prints a page with your correction applied. If the rulers measure exactly 160 mm and 220 mm, you are done. If they are still off, enter the measured values into the lower X and Y fields and click [Refine]. The correction is multiplied by the remaining error to fine-tune it.
- Click [Close] when you are finished.
- (Note) Calibration values are stored per printer. If you use multiple printers, calibrate each of them. When you print to a printer that has not been calibrated yet, Leathercraft CAD suggests calibrating it once.
- (Note) If you don't have a ruler that can measure 16 cm and 22 cm accurately, switch Calibration scale: in [Edit] → [Settings...] to 100 x 100 mm to calibrate with 100 mm rulers as before. Calibration values are stored as ratios (%), so switching the scale keeps your existing values valid.
(Note) The older procedures are no longer needed: up to v4.1.0, you entered the measured 100 mm rulers into the Settings dialog; up to v3.x, you also had to reset the calibration values to 100, 100 before the test print. If you are using an older version, please update to the latest version.
About Installation…
All the install packages of Leathercraft CAD have been inspected with WEBROOT SecureAnyware to make sure there is no threats. But you may see below waring message from Windows OS or macOS to prevent you from installing Leathercraft CAD. In that case, you will be able to install / launch Leathercraft CAD by following steps.
Software Installation on macOS
It’s very common with using macOS to see a warning message like below when you try to launch an application that is downloaded from a website. This will happen to you after you installed or updated Leathercraft CAD. In that case, please do the following steps to approve running it.
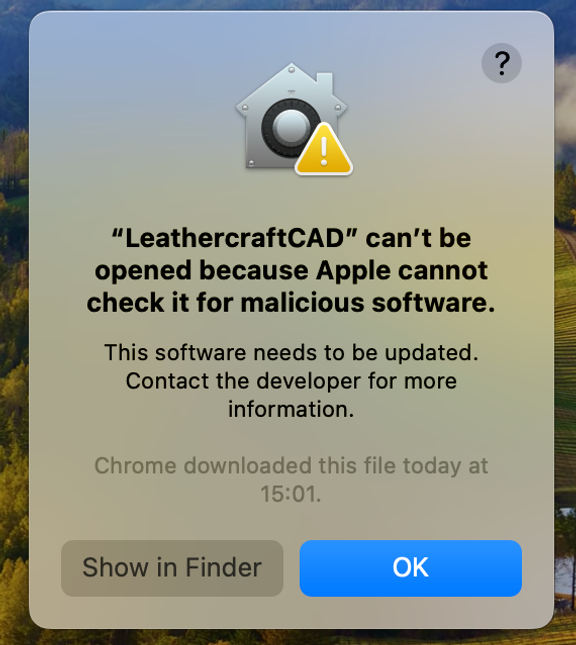
Step 0: If you use macOS 15 Sequoia, Leathercraft CAD may be blocked by the OS if you set up your Mac without login password or skipping the login at the start up. In that case, please set your login password for your mac and select not to select skipping password input at the login by setting the default user, then log out and login to your Mac again. Then follow the below instruction. Once you activate Leathercraft CAD, you can change the login option back again.
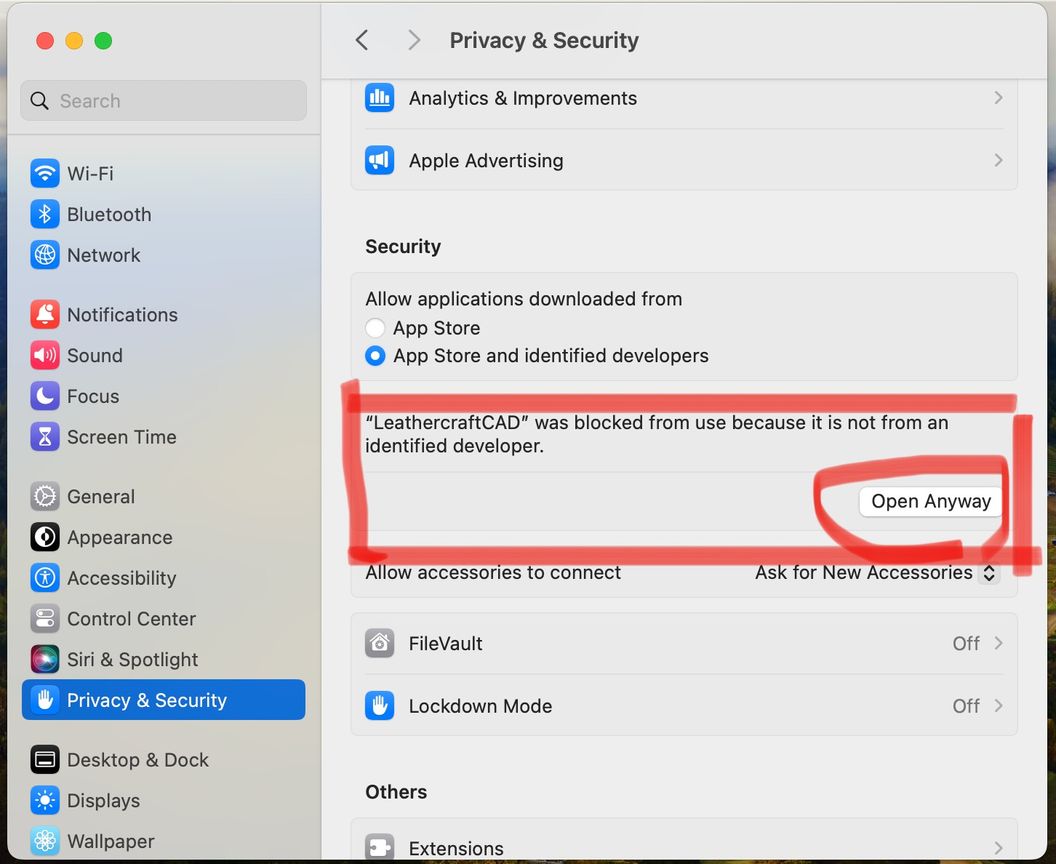
Step1. Open “System Settings” app.
Step 2. Click “Privacy & Security” from the left pane.
Step 3. Scroll down the right pane and locate the Security section describing Leathercraft CAD.
Step 4. Click “Open Anyway” button. That’s it!
Windows OS
If you have a problem opening the downloaded install package, it’s most likely the Windows Defender is blocking the access. Windows Defender, like other virus protection software, sometimes makes false alarm. As I wrote above, all the installation packages have been inspected with WEBROOT SecureAnyware application which is superior to Windows Defender that comes with Windows by default for free. As long as the MD hash of the downloaded installation package is identical to what’s written on the download page, you can assume that the downloaded install package is safe (I don’t guarantee it, but at least WEBROOT says it’s safe :-)).
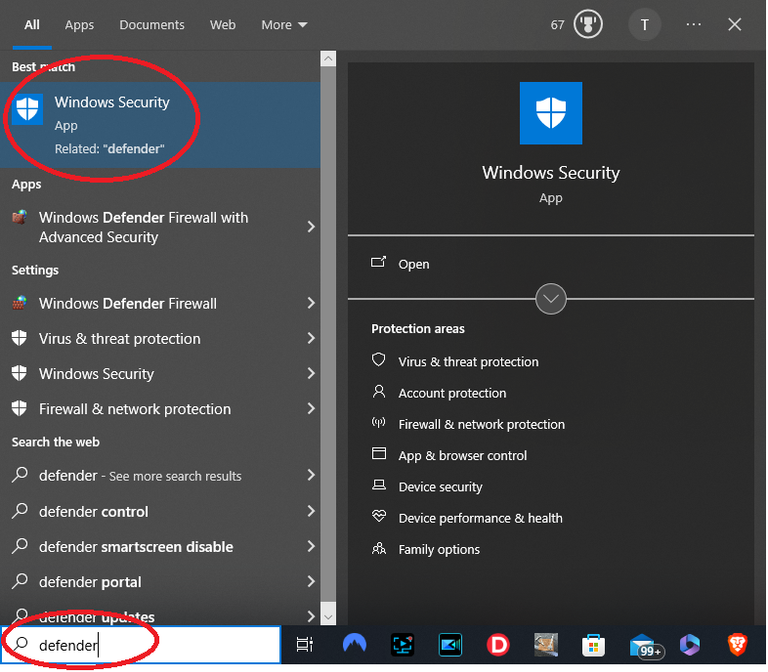
You can disable Windows Defender while you install Leathercraft CAD. In the search key word field, type in “Defender” and you will see below Windows Security app
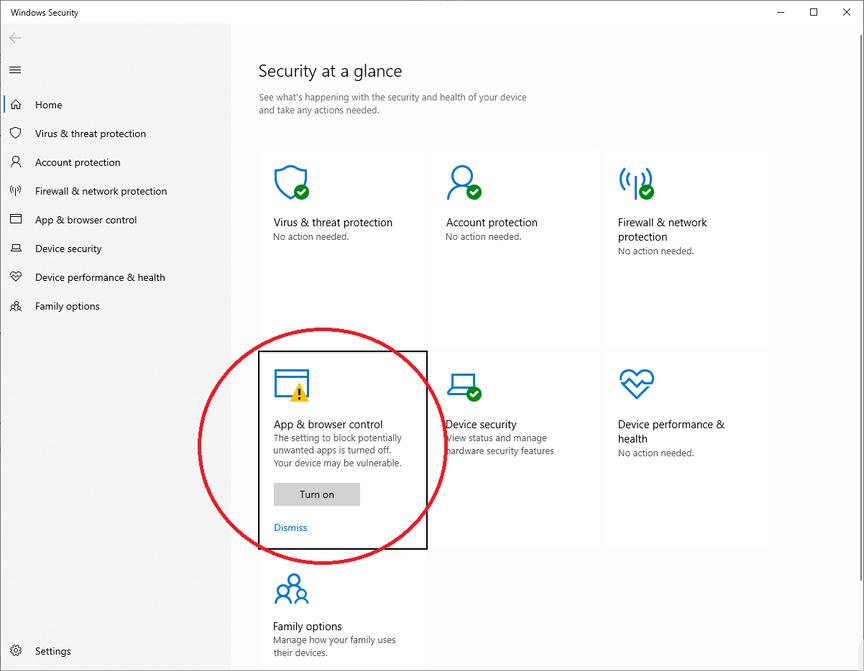
In there, you can turn off App & browser control.
Then turn off the Reputation-based protection.
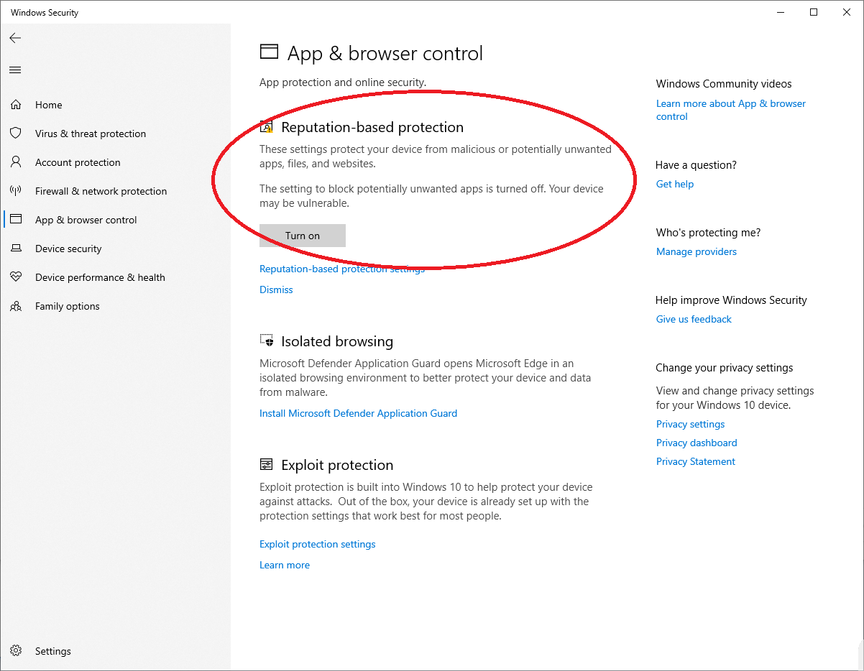
You might need to turn off other Windows Defender features during the installation process. Once you complete installation, don’t forget to turn them back on unless you are using another security program like me.